
First, the temperature controller operation panel description
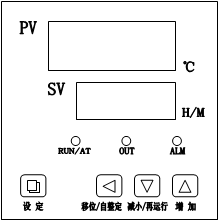
Indicator definition
1 . “RUN/AT†indicator: This light is on during operation and is off when the operation ends; this light flashes during auto-tuning.
2 . “OUT†indicator: This light is on when there is a heating output, and is off when it is on.
3 . “ALM†indicator: This light is on when the sensor is abnormal or over temperature alarm, and vice versa.
Second , the temperature controller operation and use
1 . The controller is powered on. The upper display shows the “index and version numberâ€. The lower display shows the “range value†for about 3 seconds and then enters the normal display state.
2 . Temperature and constant temperature time reference and setting
1 ) If there is no constant temperature timing function:
Click the “Settings†button to enter the temperature setting state. The lower display shows the prompt “SPâ€, and the upper display shows the temperature setting value (the first bit value flashes), which can be shifted, increased or decreased. Modify to the desired setting value; click the “Settings†button to exit this setting state, and the modified setting value will be saved automatically. In this setting state, if no key is pressed within 1 minute, the controller will automatically return to the normal display state.
2 ) If there is constant temperature timing function
Click the “Settings†button to enter the temperature setting state. The lower display shows the prompt “SPâ€, the upper display shows the temperature setting value (the first digit value flashes), the modification method is the same as above; then click “Setting†Press the key to enter the constant temperature time setting state. The lower display window displays the prompt “STâ€, the upper display shows the constant temperature time setting value (the first digit value flashes); then click the “Settings†button to exit this setting state. The modified settings are automatically saved.
When the constant temperature time is set to “ 0 â€, it means there is no timing function, the controller runs continuously, and the lower display window displays the temperature setting value; when the setting time is not “ 0 â€, the lower display window shows the running time or temperature. after the set value (see VII. table-2 runtime internal parameters of the display mode (the value of the parameter ndt)), when the display run time, a decimal point is lit next row, and so the measured temperature reaches the set temperature, the timing The timer starts to count, and the decimal point of the lower row flashes. When the time is up, the operation ends. The lower display shows “Endâ€. The buzzer hum and the beep sounds for 1 minute and then stops. After the operation is finished, press and hold the "Reduce" button for 3 seconds to restart the operation.
Note: If the temperature set value is increased during the timing, the meter will restart from 0. If the temperature set value is decreased, the meter will continue to count.
3 . Sensor abnormal alarm
If “ -- †is displayed on the display window , it indicates that the temperature sensor is faulty or the temperature exceeds the measurement range or the controller itself is faulty. The controller automatically turns off the heating output, the buzzer sounds continuously, and the alarm light is always on. Please check the temperature carefully. Sensor and its wiring.
4 . When the upper limit is over-temperature alarm, the buzzer sounds and the beep sounds, and the “ALM†alarm light is always on; when the lower deviation alarm occurs, the buzzer sounds and the beep sounds, and the “ALM†alarm light flashes. The over temperature alarm is generated and the "ALM" alarm light is on, but the buzzer does not sound.
5 . When the buzzer sounds, you can press any key to silence.
6 . “Shift†button: Click this button in the setting state to make the set value shift and modify.
7 . “Reduce†button: Click this button in the setting state to decrement the set value. Press and hold this button to decrease the set value continuously.
8 . “Add†button: Click this button in the setting state to increment the set value. Press and hold this button to increment the set value continuously.
9 . If there is no key pressed within 1 minute in the setting state, the controller will automatically return to the normal display state.
Third , the system self-tuning
System self-tuning can be performed when the temperature control effect is not ideal. During the self-tuning process, the temperature will have a large overshoot. Please fully consider this factor before the user performs the system self-tuning.
In the non-setting state, press and hold the “Shift/Auto-tuning†button for 6 seconds to enter the system auto-tuning program. The “AT†indicator flashes. After the auto-tuning is finished, the indicator will stop flashing and the controller will get a set of more. Good system PID parameters, parameter values ​​are automatically saved. During the system auto-tuning process, press and hold the “Shift/Auto-tuning†button for 6 seconds to stop the auto-tuning process.
If there is an upper deviation over-temperature alarm during the system self-tuning process, the "ALM" alarm light does not light, the buzzer does not sound, but the heating alarm relay will automatically disconnect. The “Set†button is invalid during system auto-tuning. In the system auto-tuning process, whether or not there is a constant temperature time setting, the lower display of the controller display window always displays the temperature set value.
Fourth , the temperature internal parameters of the reference and settings
Press and hold the setting button for about 3 seconds. The lower display of the controller displays the password prompt “Lcâ€. The upper display shows the password value. By adding, reducing and shifting keys, the password value is changed to the desired value. Then click the setting button. If the password value is incorrect, the controller will automatically return to the normal display state. If the password value is correct, it will enter the temperature internal parameter setting state, and then click the setting button to modify each parameter in turn. Press and hold the set button for 3 seconds to exit this state and the parameter values ​​are automatically saved.
Dried squid strips are a popular snack in many parts of the world, especially in Asia. They are made by drying and preserving strips of squid meat, which results in a chewy and flavorful snack. The strips are often seasoned with salt, sugar, and spices to enhance their taste. Dried squid strips can be eaten on their own as a snack, or used as an ingredient in various dishes such as stir-fries, soups, and salads. They are a good source of protein, low in fat, and contain essential nutrients such as vitamin B12 and selenium. However, they can be high in sodium, so it's important to consume them in moderation.
Zhoushan Fudan Tourism CO., LTD , https://www.fudanfood.com